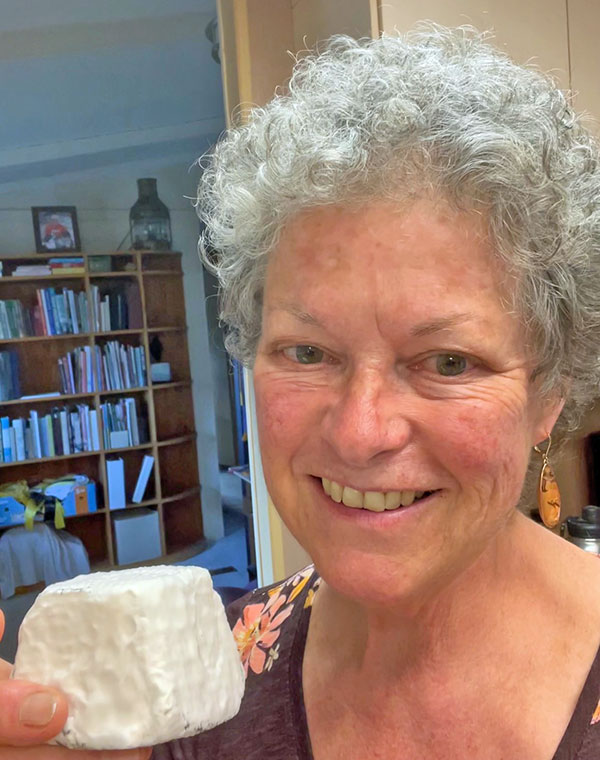
We interviewed Marybeth Bullington of Elfin Acres in Creswell, Oregon recently (click here). Marybeth gets a LOT of fresh, raw milk from her 50 +/- Nigerian Dwarf goats. Valencay is her favorite cheese, although she loves all the “fuzzy, delectable little cheeses.”
Regarding this article, she told us:
I have been pondering the arrogance of me teaching cheesaphiles about creating the mysterious Valencay. I’m feeling rather like an imposter since I don’t check PH and only ‘kind of’ follow the instructions. I just make cheese.
However, I guess trying to de-mystify the process for others is a worthwhile goal. My casual approach follows through with my original premise of how cheese came about – the vast array of cheese in the world is the result of experimentation based on local supply and conditions.
The creators of these magical transformations of milk into cheese had no thermometers, pH strips, etc. They kept at it, building on each success for their locale. True, a recipe cuts this trial and error sequence down, but one should be open to minor variations that make a cheese “yours.”
There is certain joy in preserving food for an uncertain future.
Marybeth’s Valencay
Based on recipe by Debra Amrein-Boyes in 200 Easy Homemade Cheese Recipes
Filter 20 lbs. (2.3 gallons) of fresh, raw goat’s milk into a sanitized stainless steel bucket. (Note: Dairy folks measure milk in pounds not volume.)
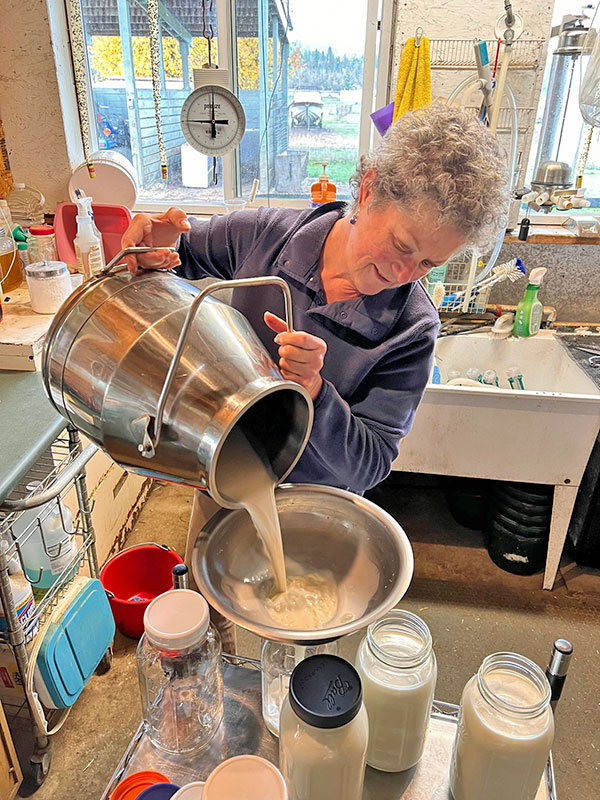
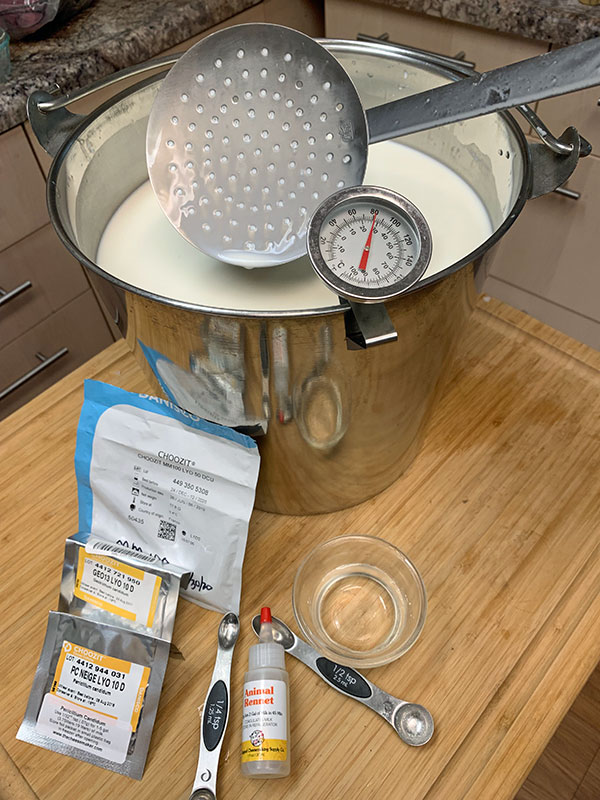
Heat to 72F and remove from heat.
Add:
Mesophilic culture, 1/2 teaspoon
Geotrichum Candidum, pinch
Penicillium Candidum, pinch
Add:
Calcium chloride, 1/4 teaspoon diluted in 1/4 cup cool water
Rennet, 1/4 teaspoon diluted in 1/4 cup cool water
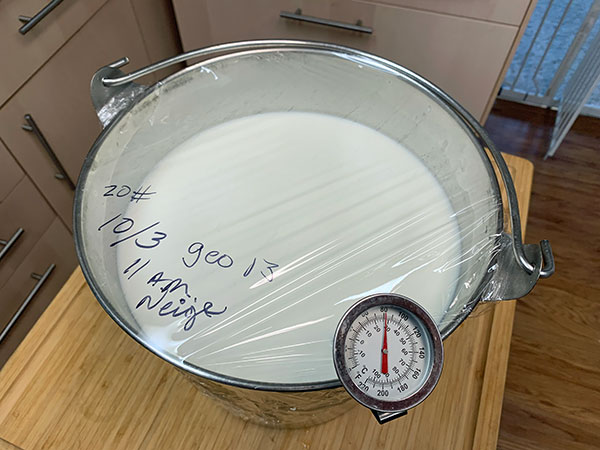
Cover and let the milk meditate for 18 to 24 hours.
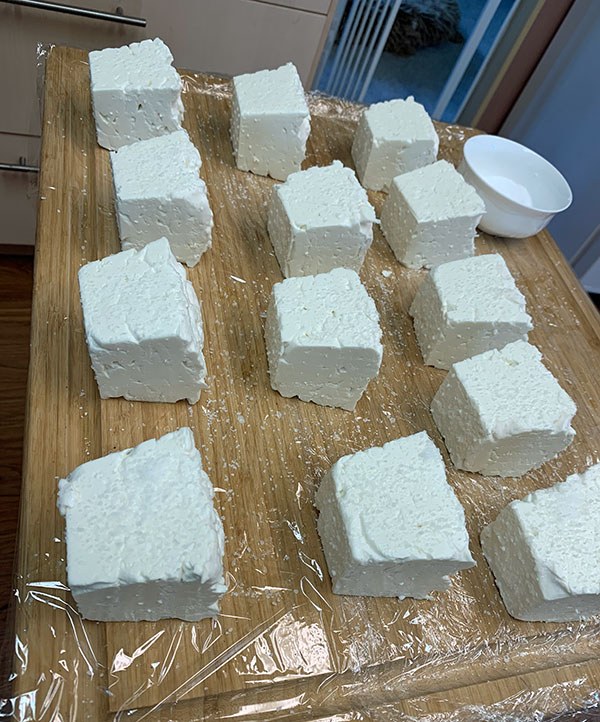
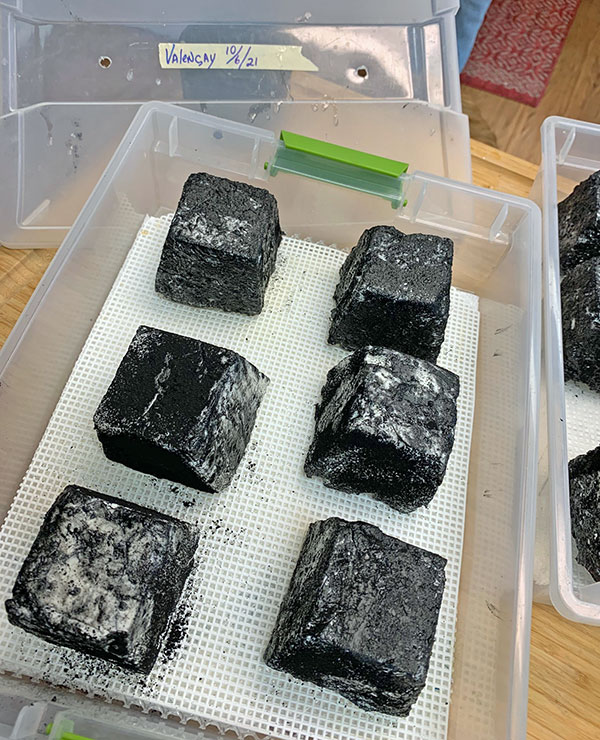
Get out your drain trays and Valencay molds. (Note: I use the handy broiler pans for draining! They are perfect and never rust.)
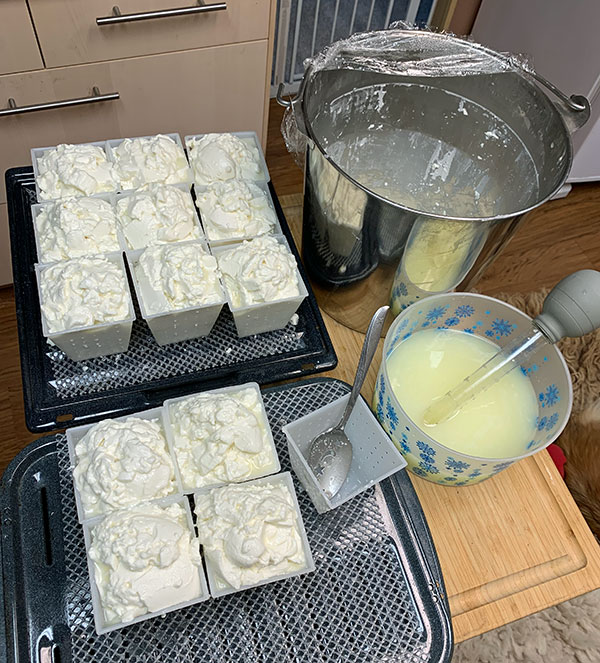
Remove the whey as you go, using a turkey baster. An extra mold can be partly submerged in the whey to keep the curds out of your baster. Keep filling the forms until they are heaped high!
After setting for an hour or so:

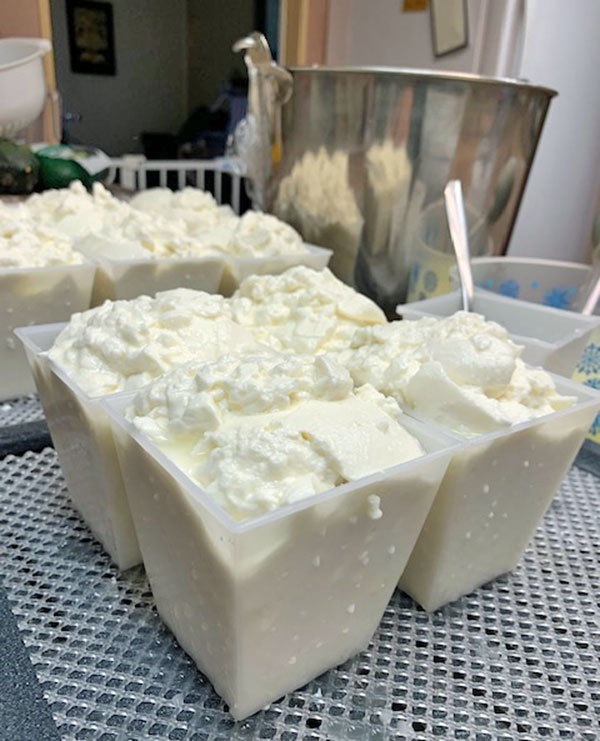
And now we wait! Our cheesy friends need to meditate for 48 hours or so before they begin their next transformation.
Note: Getting to the final white mold transformation and on to the gooey stage will take a while. Well worth the wait though.
This was prep school for the young and impressionable Valencay pyramids.
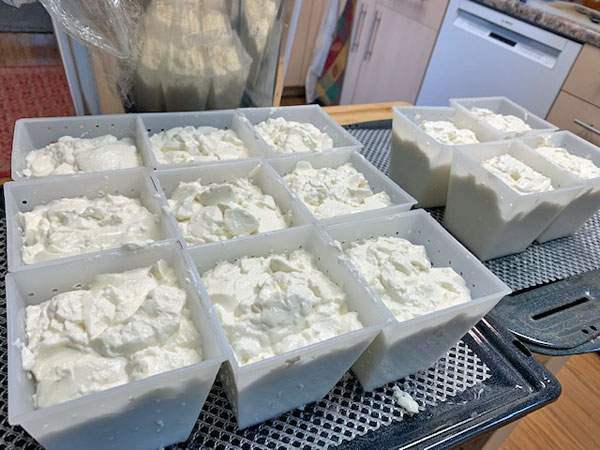
The next stage:
At this point, they have been left in their molds for 48 hours, undisturbed.
Since the next two stages are somewhat messy, line the work surface with plastic wrap.
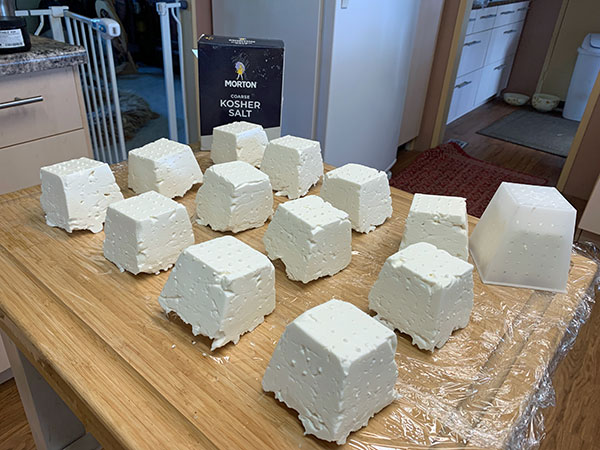
Tip the cheeses out of their molds and sprinkle all sides with cheese salt or kosher salt (about 2 tablespoons, altogether). Due to their fragile nature, I find it best to tip them from one ‘face’ to another rather than picking them up.
After salting, replace them in the molds and let them rest (and sweat) for 15 minutes or so.
While they are enjoying a little nap, get your aging containers ready. (I use plastic containers with air holes punched in the lids.)
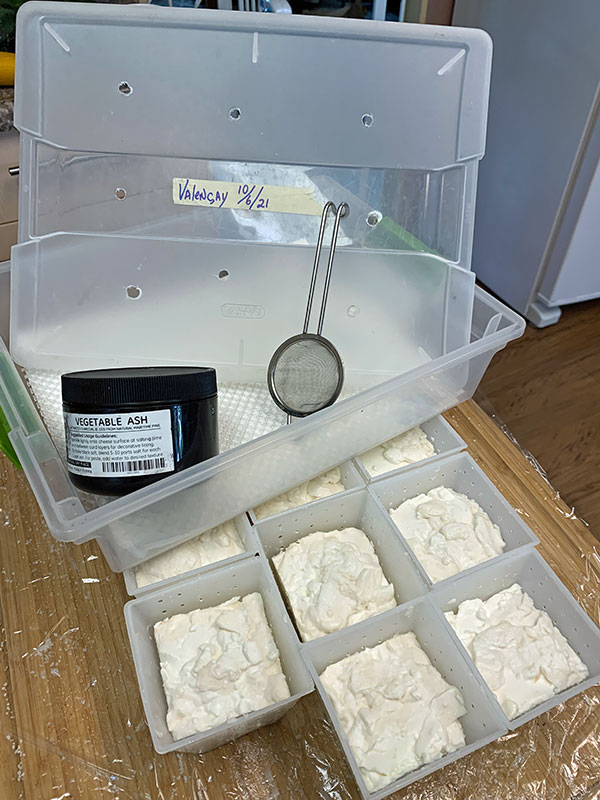
First, put down multiple layers of paper towels so your little cheesy friends don’t have to swim.
Next, add TWO layers of stiff plastic matting. Again, this is necessary to keep the cheeses from drowning. (Your mats should have the corners snipped off so you can easily change the paper towels when they are sodden.)
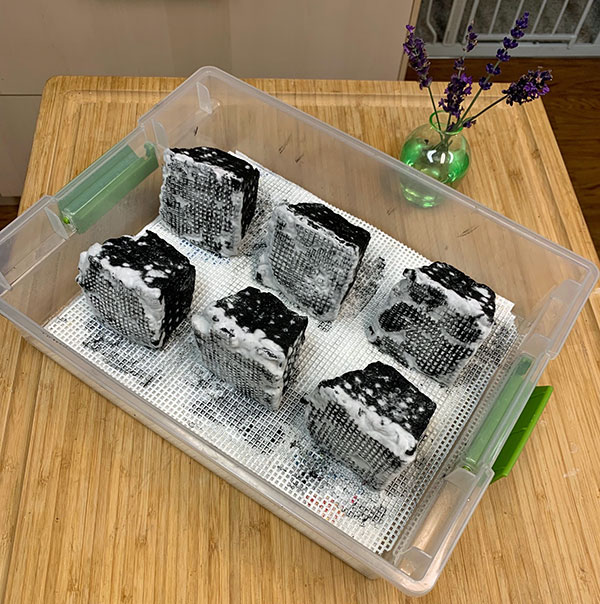
Ashing:
I use pure culinary vegetable ash (but you can use any food-grade ash).
The cheeses will have lost a bit of moisture, so put some additional plastic wrap down for a dry work surface.
Put on your gloves and get out a fine sieve and a small spoon to put more ash into the sieve as needed. Again, you will be ‘rolling’ the cheese to expose the various surfaces to the ash from the sieve.
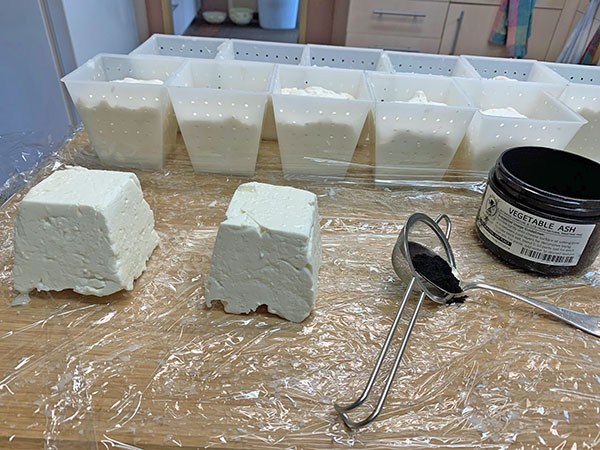
Note a couple of things:
* You only need a fine layer of ash.
* Use one hand to move the cheese while keeping the other dry and clean to refill the sieve.
* Don’t touch anything with the ‘cheese’ hand or it will be black for a long time.
* For the last few cheeses, you can probably just roll over the plastic surface and accumulate enough ash.
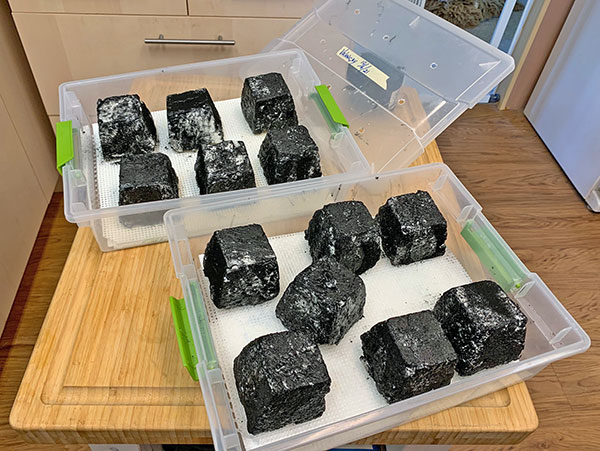
Place the cheese in your containers with at least a ½ inch clearance. When their fuzzy coats begin to grow, you don’t want them to mingle.
Monitor the cheese daily. Be sure the container has plenty of air circulation. You may need to use a couple of chopsticks to elevate the lid for additional air movement. (You may even subject them to the breeze from a tiny fan to help them dry a bit.)
If there is condensation on the sides of the container, wipe it off. If the papers towels are wet, lift the cheeses out using the double mats, wipe the container dry and put down fresh paper towels and replace the cheeses.
Periodically, when changing their ‘diapers,’ lift the cheeses gently so they don’t grow into the matting. If desired, they can be laid on a different side each time you visit them.
And now you wait. Mold growth will take a week or so. The cheese will transform from black to white again.
Then, one day, their fuzzy coats will totally enchant you!
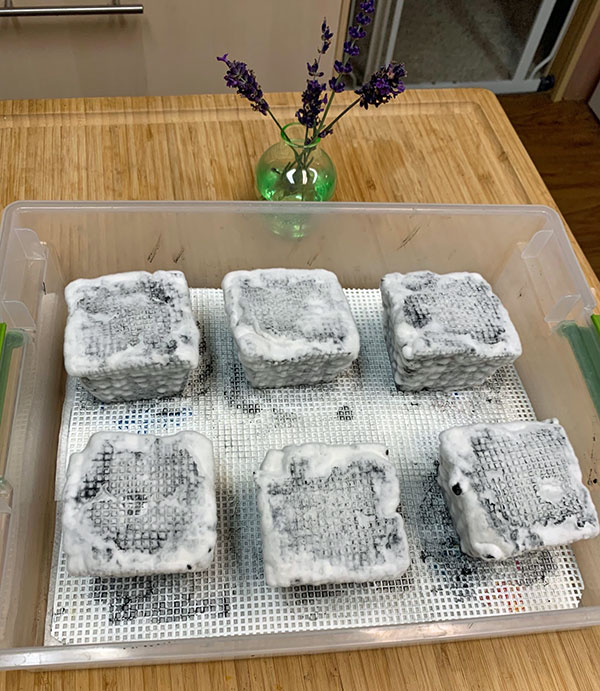
Picking them up at this stage creates feelings of nurturing! The fuzzy mold is soft and reminiscent of very fine fur. Cheesemakers have been known to start talking to their cheese. (Sometimes in the same manner as their other household pets.)
I prefer to leave the cheeses together in their container so I can monitor their progress. Another method is to wrap them in cheese paper to age them. For me, they are too adorable to hide.
I generally make a lot of these at once. Constant quality control is necessary once they start to soften.
If you have a cool place in your house, it could be your Valencays perfect hideaway. How about that extra shelf in the linen closet? Check the temperatures here and there in the house for a place that holds at 55 – 65F. They will age nicely at the traditional 55F, but it takes a bit more time. (Who wants to wait that long?) Wrapping the cheese at this point in aging allows for snuggling them into a smaller container.
When perfection is reached, the center will be soft and runny, the ash-coated exterior will, of course, have a little ‘grit’ for contrast.

Once you have added Valencay to your cheese repertoire, the sky is the limit. It encourages one to be adventurous.


Hi Marybeth, Valencay is my #1 favorite cheese on earth (so far) and I’ve made it several times from local raw goat milk. I loved reading your narrative and seeing your photos and comparing to my experiences making it. A few questions for you as I plan on trying some of your methods:
1) Why you add CaCl since the milk is raw? (I don’t with raw milk cheese.)
2) At what point in the process are you transferring the cheese to 55F cave? And until then, about what is temp is the temp of the room where you’re holding them until then?
3) In the last gorgeous photo of the cut pyramid, about how many days post-ashing has that been aged?
4) Your write-up describes heating the milk to 72F but the thermometer reads 80F…can you clarify what you do?
5) Loved reading your draining and ashing process and tips. Where do you find ash in a jar like that. I bought mine in a bag and it’s a mess to deal with!
As an aside, I’ve eaten Valencay in France, but it’s nearly impossible to find in mainland US! So I make my own. And I have to say, with good quality raw goat milk, mine was very comparable to their’s. I’ve also had Big Island Hawaii “Valencay” and it was very yummy too.
Thanks for sharing all of this. Loved reading this on a Monday morning. Extremely inspirational. I only wish that I lived near you to try your cheese and buy your milk!!!
Hi Susan!
I loved reading about your cheese adventures and especially about your affection for the Valencay. Here are the answers to your inquiries:
1. I generally don’t add the Calcium Chloride because the Nigerian Dwarf Goat milk has such an abundance of solids it really doesn’t need it. However since this is for the rest of the world the goat milk they have access to may not be the same. This is what is listed in the recipe I use for “Reference”.
2. I usually make my white mold cheeses in the fall and winter so the cheese may not ever go to 55 degree cave for aging. It will likely end up on a shelf in a cool location. If I make the cheese well ahead of unveiling at a holiday gathering I will retard the ripening by keeping it wrapped in the cheese storage fridge.
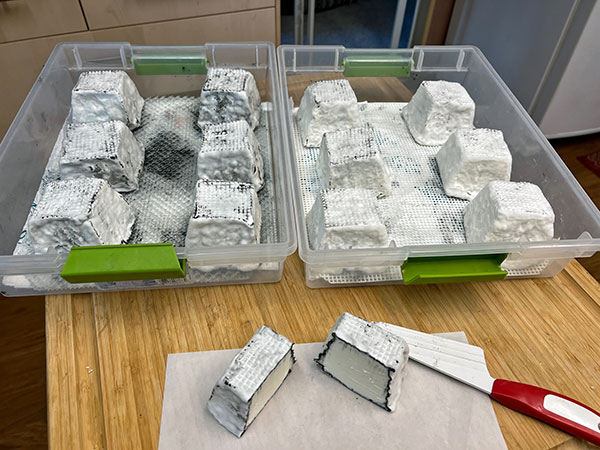
3. It was probably 10 days to 2 weeks. Aging is perfect with 6 in my container. The 7th pyramid created a little too much moisture. Both containers were from the same batch. You can see the difference in the amount of white mold in the optimum humidity vs the ‘just a little too much’ on the left.
4. 72 degrees is from the recipe. This milk was just brought in from being strained after milking. The girls are hot mamas!
5. A little ash goes a long way. That particular container is from a long since defunct supplier. I now just refill it from the same messy little bag you have! It’s still a messy project but worth it!
So glad to hear from another aficionado of the pyramids!
MaryBeth, your little Valencay’s are darling! Your nurturing them with love makes for a warm and inviting cheese. I’ve never incorporated ash into my cheeses. I’ve toyed with the idea of a Morbier but then thought, “What’s the point?” I suppose ash goes back to the historical nature of the cheeses. I’ll have to try it!
Lovely photos of your little clan!
Peace, and happily cheesing!
Hello Charles!
Thank you for your kind comments! Do let us all know about your adventure into Morbier. It’s not one I have tackled yet so I would love to hear about your experience with it.
Mbb
That was a fun & charming read. Thank you for sharing. I have goats too so coming up with new goat milk friendly recipes is a joy.
I had wild Blue Cheese mold infect one of my Colby cheeses after it was cut. I had never made blue cheese before. I realized the truth of what you said about wild mold and yeasts creating cheese from the environment. We are so fortunate with the many gifts from nature.
P.S. I talk to all manner of things and wave at single hawks sitting on a telephone wire. With their hawk eyes they see it every time. So talking to a living culture seems like a brilliant idea.
Hello Margaret,
Wonderful to meet another person that talks to the creatures we share the planet with 🙂
So I’m wondering if the Colby turned into a happy blue Colby or just a Colby with an identity crisis? I hope it was delicious in an avant garde fashion.
As a fellow ‘herd queen’ I know the joy of finding a recipe that uses a LOT of milk and doesn’t require too much fussing about.
Gotta love all cheeses that are happy to do their thing on the counter overnight. The fussy bits are much easier in the morning with coffee in hand!
Mbb
The Wild Blue was delicious but the yellow cheese dye I put in it made the colors off putting “orange and blue green” . Still if you closed your eyes it was just like any good blue cheese I have had.
Maggie,
I have to know – why did you add yellow food coloring to it?
I – don’t – know. I asked myself that very question. It was a moment of madness and experimentation.
Ha! Been there.