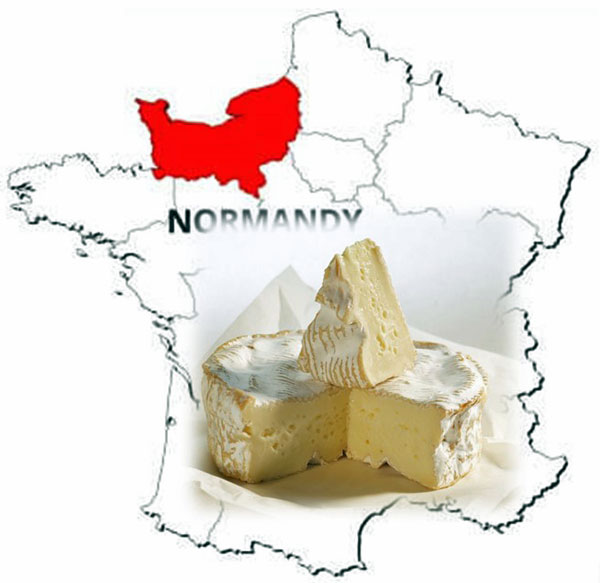
Picture by Yoel Blumberger. Sources: freeworldmaps and Dairy Products of France
In this article, Yoel Blumberger (a home cheesemaker in Tel Aviv, Israel*) has given us a thorough description of the flocculation point method for determining when the curds are set and ready to cut.
He has also given us a recipe for Camembert de Normandie which was provided by Stephanie Conrad, one of the last cheesemakers in France making AOP Camembert with raw milk.
And finally, he has shared with us his own (time saving) variation on Stephanie’s recipe.
This is the second of 3 interconnected articles by Yoel. The first was posted August 9th – Yoel Blumberger: Cheesemaking Group in Israel and a Recipe for Castelmagno. The third article is about The Role of Cheese in Israel.
There are many other articles by Yoel in our archives and we are very grateful to him for contributing them.**
Camembert de Normandie AOP and the Flocculation Point Method
1. The background
This article, in a way, follows another one, which was published August 9th and tells the story of a cheesemaker’s group I belong to in Israel (Yoel Blumberger: Cheesemaking Group in Israel and a Recipe for Castelmagno)
The group’s last tour was to Normandy where the participants learned how to produce Camembert de Normandie AOP (and other local cheeses). I will share the original recipe with you in this article.
Stephanie Conrad, the dairy owner and cheese maker uses a certain method to determine the exact time between the introduction of the enzyme into the milk and the beginning of the cutting phase. This method, the flocculation point method, is used not only in the production of the original Camembert but recommended for the making of all enzymatic cheeses.
As not everyone is acquainted with this method, the article will elaborate on it before getting to the recipe.

Traffic sign in Normandy. Credit: Sarit Yuker
2. Camembert de Normandie AOP
Camembert is one of the best-known and beloved cheeses in the world. The New England Cheesemaking Supply website (cheesemaking.com) has even published two recipes for making it.
However, making the AOP Camembert cheese is different in some aspects (ingredients and process) from the production, as described in most recipes. I thought it would interest you to know how the cheese is officially made.
Our group learned to make Camembert at Stephanie’s dairy (Les Fromages de Stephanie). Stephanie has been making her Camembert cheese for many years and it is exceptional.
There, the cheese is made according to the AOP’s strict protocol which defines every ingredient and every stage and action in production. It is one of the last three dairies left in France still producing Camembert from unpasteurized milk.
Every day, the dairy receives fine cow’s milk from two committed farmers who grow and milk only Norman cows – pasture fed in the summer and fed hay in the winter. These cows have never been given the slightest additional silage.
Stephanie makes several types of lactic cheese, Tomme de Normandie and, of course, Camembert de Normandie AOP. The dairy does not have a website, but an idea of the cheeses produced there can be obtained from the website of one of its resellers – https://www.lesresistants.fr/resistants/stephanie-conrad.
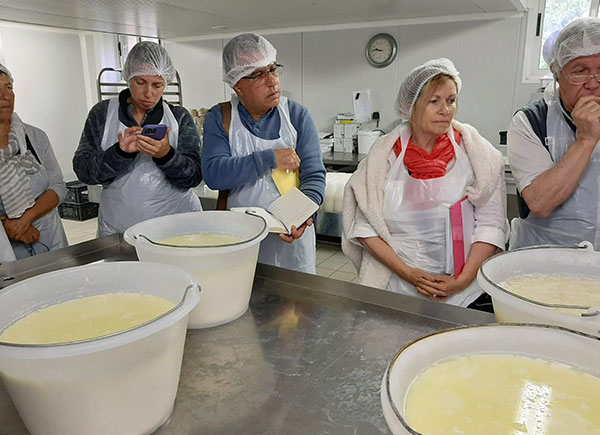
If any of you are interested in visiting the dairy, whether in person or in a group like ours, you are invited to contact Stephanie through me (labda7@gmail.com). In the photo below, you can see part of the group at Stephanie’s dairy while she teaches.
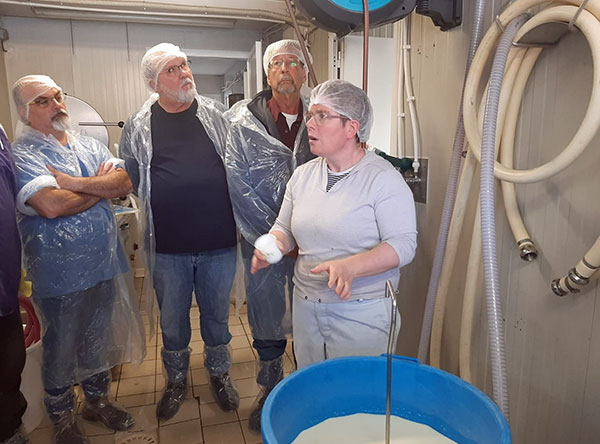
Stephanie during a lesson. Credit: one of the group’s members
One of the nice things we came across in France is the collaboration between the cheesemakers of the region. It is expressed in several ways. For example, when one of them goes to sell in a local market in one of the cities in the area or even a market very far from the area (Paris for example), they take products from their neighbors to help sell their products.
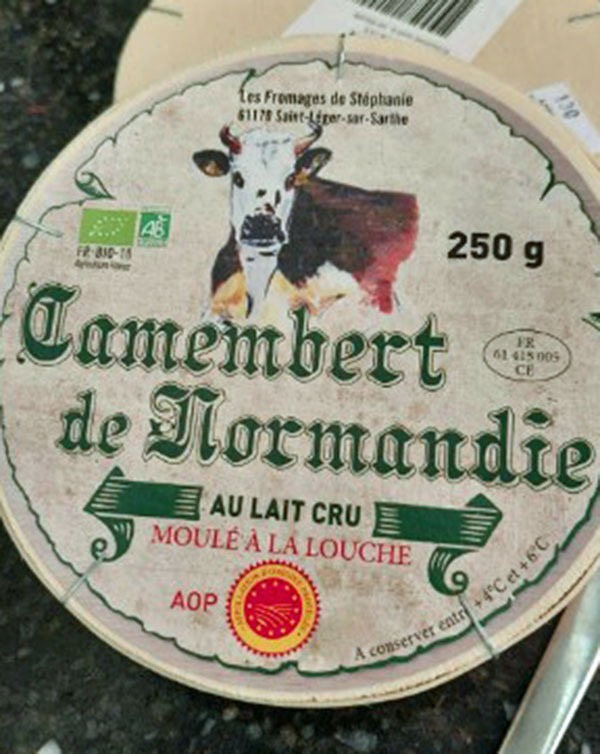
Stephanie’s Camembert de Normandie
“AU LAIT CRU” indicates that the cheese is made from unpasteurized milk. “MOULE A LA LOUCE” indicates that the cheese is made by the traditional method of layering, as you will see in the recipe. LOUCHE is a special ladle for transferring the cheese to the molds and holds a volume of 1/5 of the mold (will be explained later). The photo below shows how it is done.
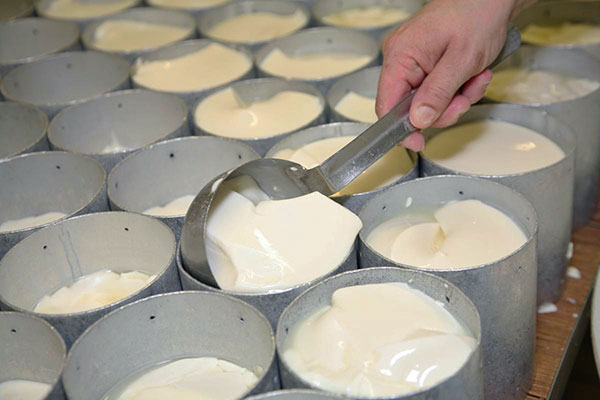
Louche with cheese molds. Credit: https://en.normandie-tourisme.fr/
3. When is the time to cut the cheese?!
After adding the rennet to the milk, the cheese maker has to wait until the curd is set and ready to be cut. There are three main methods to determine how much time to wait before starting to cut:
- Fixed time method. There is a given fixed time in the recipe that tells you how long to wait. This method obviously is not accurate and not recommended at all because milk types, rennet strength and starter cultures vary widely around the world and across the season. Thus, a non-optimal time for cutting is highly probable.
- The “clean break” method. You wait 15-20 minutes, using your experience as a guide and, then, you cut the curd. When the curd is ready to be cut, it will break clean. The whey which develops in the break is not too cloudy (this is the case when you cut too early) and the whey is not too clear (this is the case when you cut too late).
- The flocculation point method. This is used in the making of the Camembert de Normandie AOP.
The flocculation method is the most complex and the most accurate. For this, you need to observe the onset of flocculation, which usually occurs more or less 10-15 minutes after adding the rennet. This time (denoted by TP) is then multiplied by a FACTOR (sometimes called the multiplier), which depends on the cheese type of being made. The product of TP and the multiplier is the TD, which is the total elapsed time from the addition of the rennet until the moment to cut the curd.
So, TD = FACTOR x TP.
This method will supply the optimum cutting time in proportion to the flocculation time.
There are two phases in the curd formation. First is the enzymatic phase followed by the aggregation phase where the curd is formed. The flocculation point is at the start of the aggregation phase.
These times are dependent on the levels of casein and calcium, which vary with the source of the milk. Thus, this method takes into account the milking/lactation cycle throughout the year. It also takes into account the enzyme strength, the ambient temperature and some other minor factors. The factor applied to the flocculation time is a function of the cheese type being made, normally between 2 and 6. The table below shows the multiplier for various cheeses.
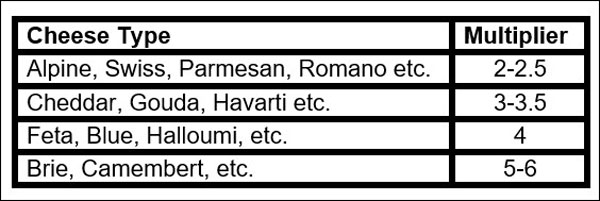
The multipliers are different for different cheese types because the curd, at the time of cutting will have different strength. Young curd set will more readily and release whey when cut versus older curd which will release less. Thus, this time, along with the cut curd size are large determinants in the final moisture content of the cheese.
Camembert which is our main subject, has a high multiplier, so, the curd holds the whey and there is almost no cutting and stirring. The whey stays in the curd, contributing to the moist and creamy texture that the Camembert is proud of.
You need to put the enzyme in a quantity that will make your TP 10-14 minutes. If the TP is not in this range, the method will not supply you an accurate TD. If you are outside this range, make the needed correction of the amount of enzyme next time you make the cheese.
These are the stages of the process to find the flocculation point and determine the TP:
1. Add the rennet to the milk. The quantity of the rennet is in the recipe (or in the producer’s user instructions). Start a timer.
2. Leave the milk for 7-8 minutes. Take a small plastic bottle cap (of mineral water for example) and place it on the surface of the milk. The cap will float.
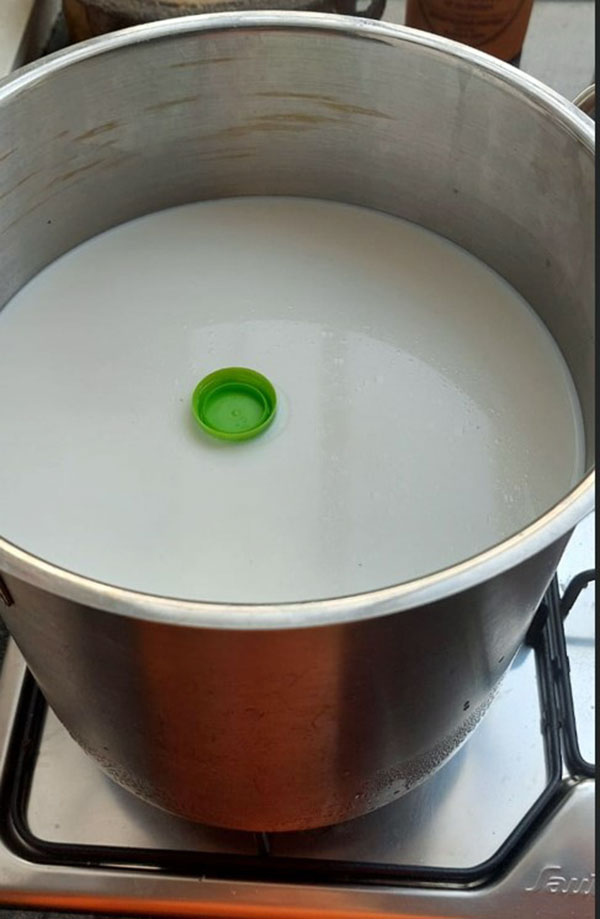
Checking the flocculation point in my dairy. Credit: Yoel Blumberger
3. Spin the cap gently. It should rotate freely. Retry every minute.
4. You should notice that after 9-10 minutes, there is a slight resistance from the milk. Test by spinning the cap every 30 seconds.
5. Between 10 to 14 minutes, the bowl should become “stuck.” This is the indication that the curd mass has formed. This is the flocculation point. The French cheesemakers call the point “the catch point,” maybe because the milk caught the cap (-: As noted, the elapsed time is indicated by TP. Remove the cap from the milk.
6. Having the value of TP, you can calculate the total time from adding the rennet until cutting, the TD. It is very simple, TD = FACTOR x TP. So, for example, if the rennet is added at 09:00 and the cap stopped swiveling at 09:10 (TP = 10), assume the factor for this cheese is 4. So, TD = 4 x 10 = 40 min. Therefore, you have to cut at 09:40.
4. The recipe!
This is the recipe, courtesy of Stephanie:
Ingredients:
- 2 gallons of Milk – Stepanie’s Camemberts are 250 gr (8.8 oz) each. For each one, 2.2 liters (0.6 gallons) of milk are needed. (In the dairy, the milk is a mixture of 2/3 whole milk and 1/3 skimmed milk.)
- 1/4 tsp Flora Danica culture (Stephanie’s recommendation for substituting the original mother culture used in the dairy)
- 1/32 tsp Geotricum
- 1/8 tsp Penicillium Candidum (Neige)
- Pinch of Choozit ARN (Aroma Linens). A substitute for that can be SR-3 Brevibacterium Linens
- 1/8 tsp of KL 71 cheese yeast
- 1/4 tsp calcium chloride (for pasteurized milk)
- 1/4 tsp single strength liquid rennet
Note: Already in the ingredients’ list, one can see that the recipe differs from the common one. The Linens and the KL yeast are an addition.
Equipment:
3 bottomless cylindrical molds (Quantities are explained in Section 5 below.)
6 draining mats which serve as the bottoms of the molds (2 for each mold)
Instructions:
Production Day -1
Heat the milk to 15-18C (60-65F). If it is necessary to pasteurize the milk, pasteurize and cool to 15-18C (60-65F).
Add all ingredients.
Wait 19 hours at 15-18C (60-65F) to let the culture work.
Production Day
The pH should be below 6.50. It is generally recommended to use a pH meter or at least, use strips for measuring pH.
Note: If the pH is more than 6.5, it may be because there was not enough culture, especially if the milk was pasteurized, or the temperature was not kept.
Heat the milk to 32C (90F).
Divide the milk into five small containers. Divide the enzyme into 5 small glasses.
Four containers waiting for their turn. Credit: one of the group’s members
Add enzyme to the first container. The time to the flocculation point is TP = 10-12 minutes, and the total time from adding the enzyme to cutting is TD = 4 x TP. That is about 40-48 minutes.
Cut the curd into 3 cm (1¼”) pieces and wait 5 minutes. At the end of the cutting, insert the enzyme into the second container. Ladle the curd from the first container into the molds, filling each mold to one-fifth of its volume. When it is time to cut the curd in the second container, do the same thing and so on until you finish transferring the curd to all the molds.
A thin stainless-steel disc should be placed on top of the cheese in each mold to prevent it from collapsing inwards and to retain its shape. You can improvise one from any food grade material – you just have to cut it to fit the mold.
The first turn (flip) is after 4 hours. At this stage, the pH should be 4.80-5.20. As the mold is bottomless, you just have to place another draining mat and board on top of the mold and flip it over. The curd will drop evenly to the new draining mat.
Production day + 1
Remove the cheese from the mold. The pH is 4.5-4.70.
Wait 3-5 hours.
Dry salt the cheese. There is no exact quantity of salt in the recipe but 2% of the cheese weight will do. After producing your first batch, you can change the amount of salt to match your taste.
Temperature is 18C-22C (65F-72F).
Production day + 2
Age at 13C-15C (55F-60F). Humidity 89-93%.
Production day + 13
Packaging, wrapping in paper and inserting into a box. Temperature is 6C-9C (43F-48F).
Production day + 22
Cheese is ready!
5. Earn more than 2.5 hours with my small change to the recipe.
Israelis are known for their desire to streamline things and to think “outside the box.” Even processes that have been performed in dairies in Europe for many years and passed from grandfather to father and son for several generations do not escape the Israeli’s sharp eye. Naturally, there are cases where this interference gets bad reactions…
Anyway, being an Israeli, I examined the five-layer method. I searched the protocol to understand what it is needed for. I found that the method allows better drainage of the whey (relative to the
usual method of filling the whole mold at once) and thus contributes to the special texture of the Camembert. And indeed, the texture is very special.
However, this method adds about another 160 minutes to the process (4×40) which is more than two and half hours. Therefore, I made a change to the process to shorten the ladling phase. The change tries to preserve the goal (increased good drainage) more effectively, in much less time. Besides earning time, you also don’t need to divide the milk into 5 containers and the enzyme into 5 glasses.
The disadvantage of the method is the need for many molds because for each mold of final cheese you must use another 4 molds. As the curd stays in the 4 of them only 40 minutes, I made molds using medium sized yogurt containers which (luckily for me) have the same diameter as the real ones. I just had to remove their bottoms and make holes on the side walls.
Leave the milk in one pot and do not divide into five pots as originally required.
Add the enzyme and determine the point of flocculation and the total time until cutting.
As mentioned, this will take about 40 minutes. Arrange the molds in groups of five (I used 1 real mold and 4 that I have made from the yogurt containers).
Cut the curd and transfer to each mold curd that will fill one fifth of its height. Wait 35-40 minutes.
Start with the first group of 5 molds. Take mold #2 and transfer its content to mold #1 over the cheese that is already inside. Transfer the content of mold #3 to mold #1 so you have 3 layers.
Continue transferring the content of molds #4 and #5 into mold #1 so you have a complete whole cheese in mold #1 with 5 layers. You can compromise on 3 layers instead of 5.
So, if you start with 1.8 gallons (which will give 3 cheeses), 9 molds will suffice – 3 per cheese.
The picture below demonstrates some of the stages with the two types of molds:
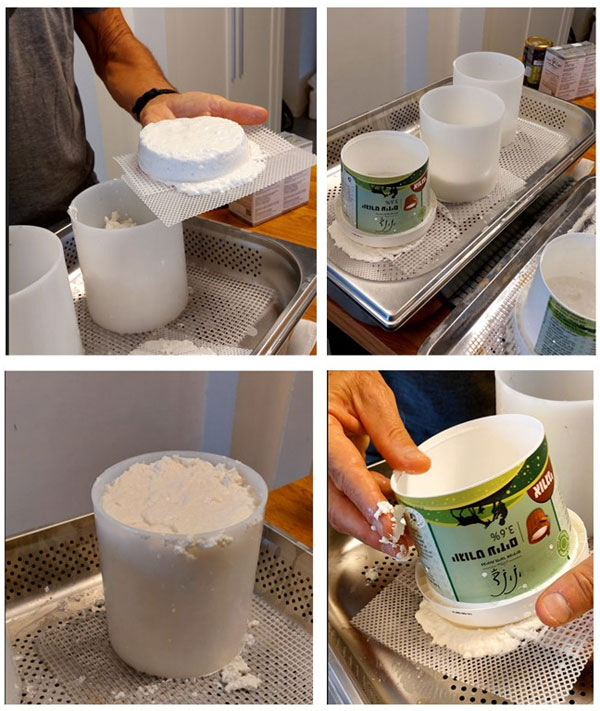
The optimal transfer point must be found. It is when the curd is solid enough so that it will not fall apart when transferring from mold to mold and is not too dry because this will cause separation between the layers.
You can help unite the layers with the handle of a fork or spoon, which you use to stab very gently from the top to the bottom of the cheese. This will help to achieve a perfect connection between the layers.
From here, continue according to the recipe in the rest of its stages.
Please do not tell Stephanie anything of this! (-:
Good luck with any method you choose!
*We interviewed Yoel in June, 2019 – Yoel Blumberger in Tel Aviv, Israel
**Since then, he has contributed the following articles:
Yoel Blumberger: Cheesemaking Group in Israel and a Recipe for Castelmagno
Making Pecorino Toscano and Variations by Yoel Blumberger
How to Make Special Containers for Aging Cheeses
How to Make a Peg Mill by Yoel Blumberger
Yoel Blumberger’s Humidity Control System
Yoel’s DIY Cheese Drying Box


I’m very grateful to Stefanie and Yoel for sharing this recipe. On my first attempt I left the milk 19 hours at a slightly higher room temp (67F) than suggested (60-65F) and the milk soured so much that I think it had ‘lactic coagulation’ – I didn’t have a PH meter handy, but from there nothing seemed to go right. My second attempt I left the milk at a 66F room temp for 11 hours when it reached PH6.3 so I added rennet and everything went smoothly. Sharing in case this is helpful to others!
What a fantastic article !! Very practical and useful ! Typical Israeli. They don’t just follow a process blindly. They want to understand what is really happening. Been there many times and represent in South Africa the best pcb manufacturing company in the world : Eltek Ltd in Petach Tikva, Israel.
Thanks, Gert. Good to read your warm words! When in Israel again, you are invited for tastings (-:
Yoel, what a fantastic write-up, thank you! I visited Normandy (all over) in 2017, but sadly, that was before I began making cheese 🙂 Otherwise, I’d have sought out some cheese and butter lessons and tours! I make cheese with raw Jersey milk and raw goat milk, and mold ripened cheeses are my favorite type to make. I need to buy some linens and yeast from NEC to give this recipe a go! Again, thank you for sharing all of this. BTW, I was taught using floc point method, so that’s what I use too.
Thanks Susan, I am glad that you enjoyed the article. I envy you, working with raw milk. For making cheese with raw milk I have to fly to Europe… Buying yeast try to get the KL 71, the one in the recipe. I recently found that KL is special, being anaerobic, so it works in the absence of oxygen inside the body of the cheese, as well as on the rind surface, so I guess it is important.
Thank you so much for a very instructional and fascinating info, recipe, and tips. I’m intrigued by the 19-hr lower-temp culturing time — I would like to try that in winter when that temperature suits very well here! In the camembert recipe, “enzyme” refers to “rennet,” right? Just making sure. Also, I’d LOVE to see Stephanie’s Tomme de Normandie recipe!!
Welcome. Yes, enzyme is rennet. My mail is in the article so you can send me hello and I will resend you the recipe you asked for. A comment seems to me not a good place to post recipes (-:
In my humble opinion the only way to make cheese successfully is by using the flocculation method described in Yoel Blumberger’s post here and as will be seen from Merryl Winstein’s wonderful book, “Successful Cheesemaking: Step-by-Step Instructions and Photos for Making Nearly Every Type of Cheese,” which provides greater detail about how and why it works so well and is universally applicable to all cheesemaking.
Thank you, Yoel, for bringing the flocculation method to everyone’s attention.